Take note of ubuntu performance performance when configuring a Atomic instance
The following will be covered here
- Create an indexing snapshot
- Restore a snapshot
- Optimize indexing operations for bulk processing - not yet complete
- Reset elastic credentials
- Upgrade Elasticsearch from 7.x to 8.x using upgrade assistant - not yet complete
- Recover Missing documents via a script
- Recover Missing documents manually (failures during indexing operations)
- pin up container on secondary host to participate in indexing operations - not yet complete
Create an indexing snapshot
- Add path.repo: ["/data/snapshots"] to elasticsearch.yml where you would like to store your snapshots
- Stop your hyperion indexer and api process
- Restart elasticsearch
- Log into kibana
-
Using dev tools under management, create a snapshot repository
Please note that the above settings has been optimized for throughputPUT /_snapshot/my_repository { "type": "fs", "settings": { "location": "/data/snapshots", "compress": true, "max_restore_bytes_per_sec": "1gb", "max_snapshot_bytes_per_sec": "1gb" } }
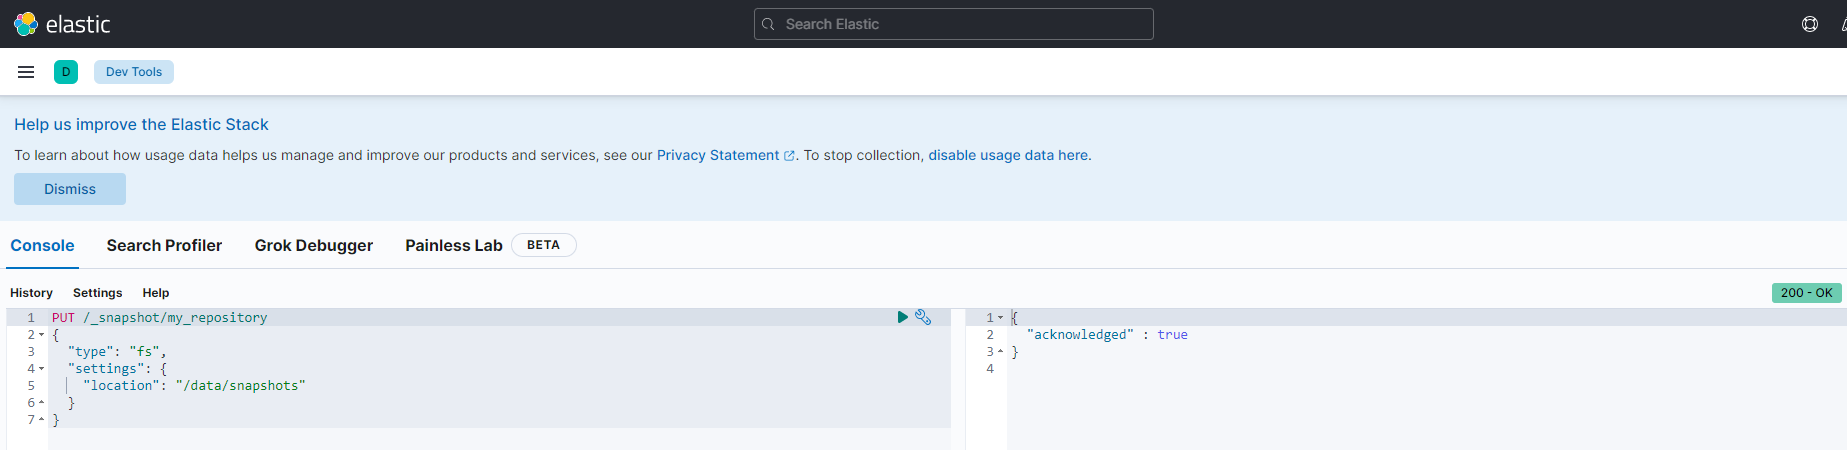
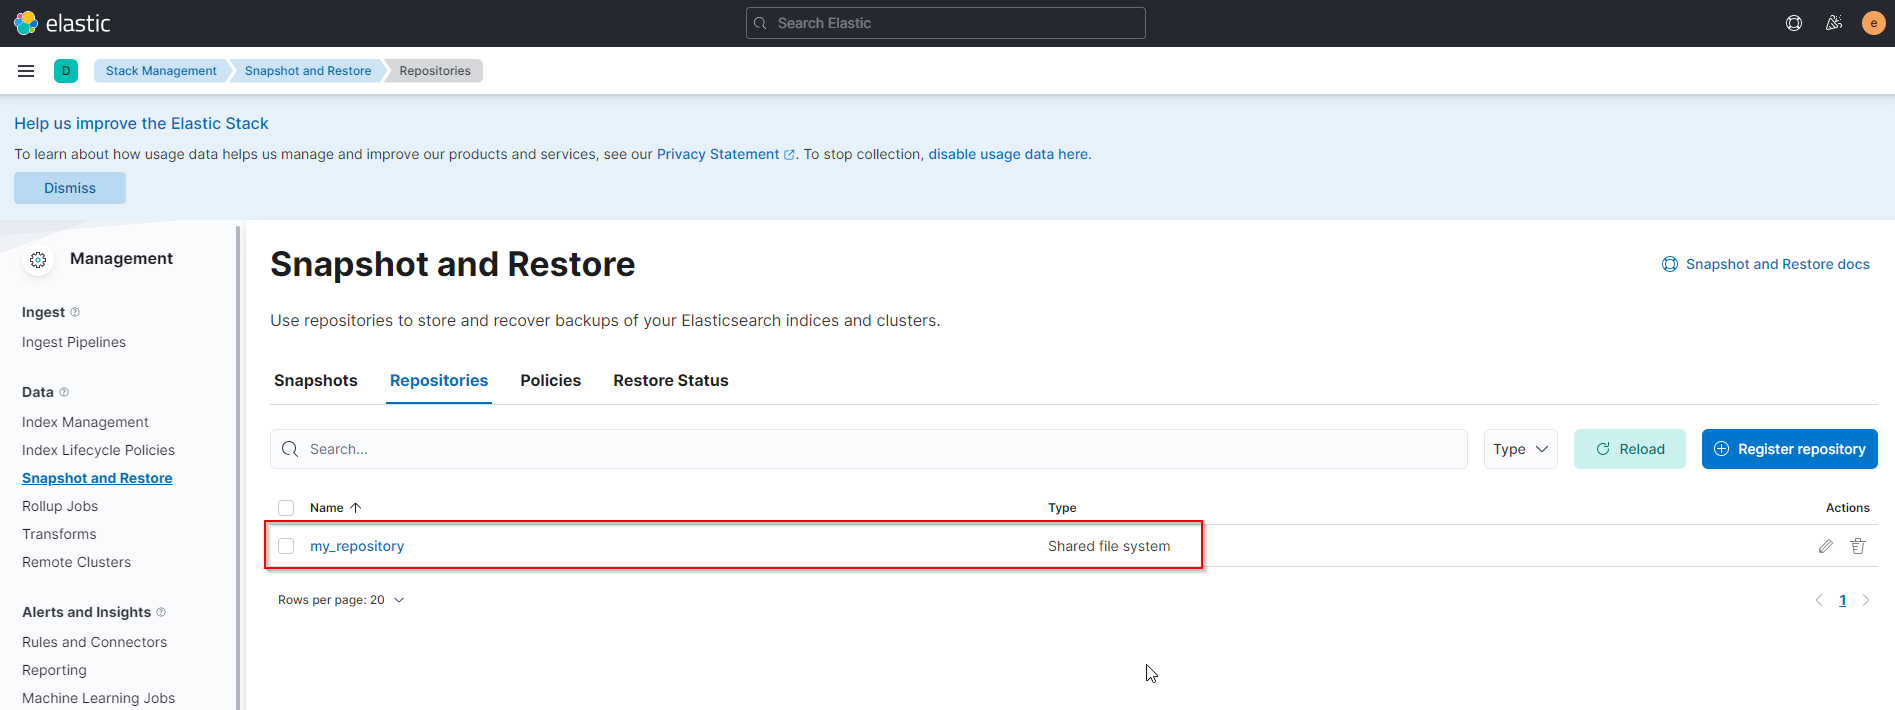
You should now see your repository being visible for snapshots
-
Make sure that you set ownership to elasticsearch on the snapshot directory
-
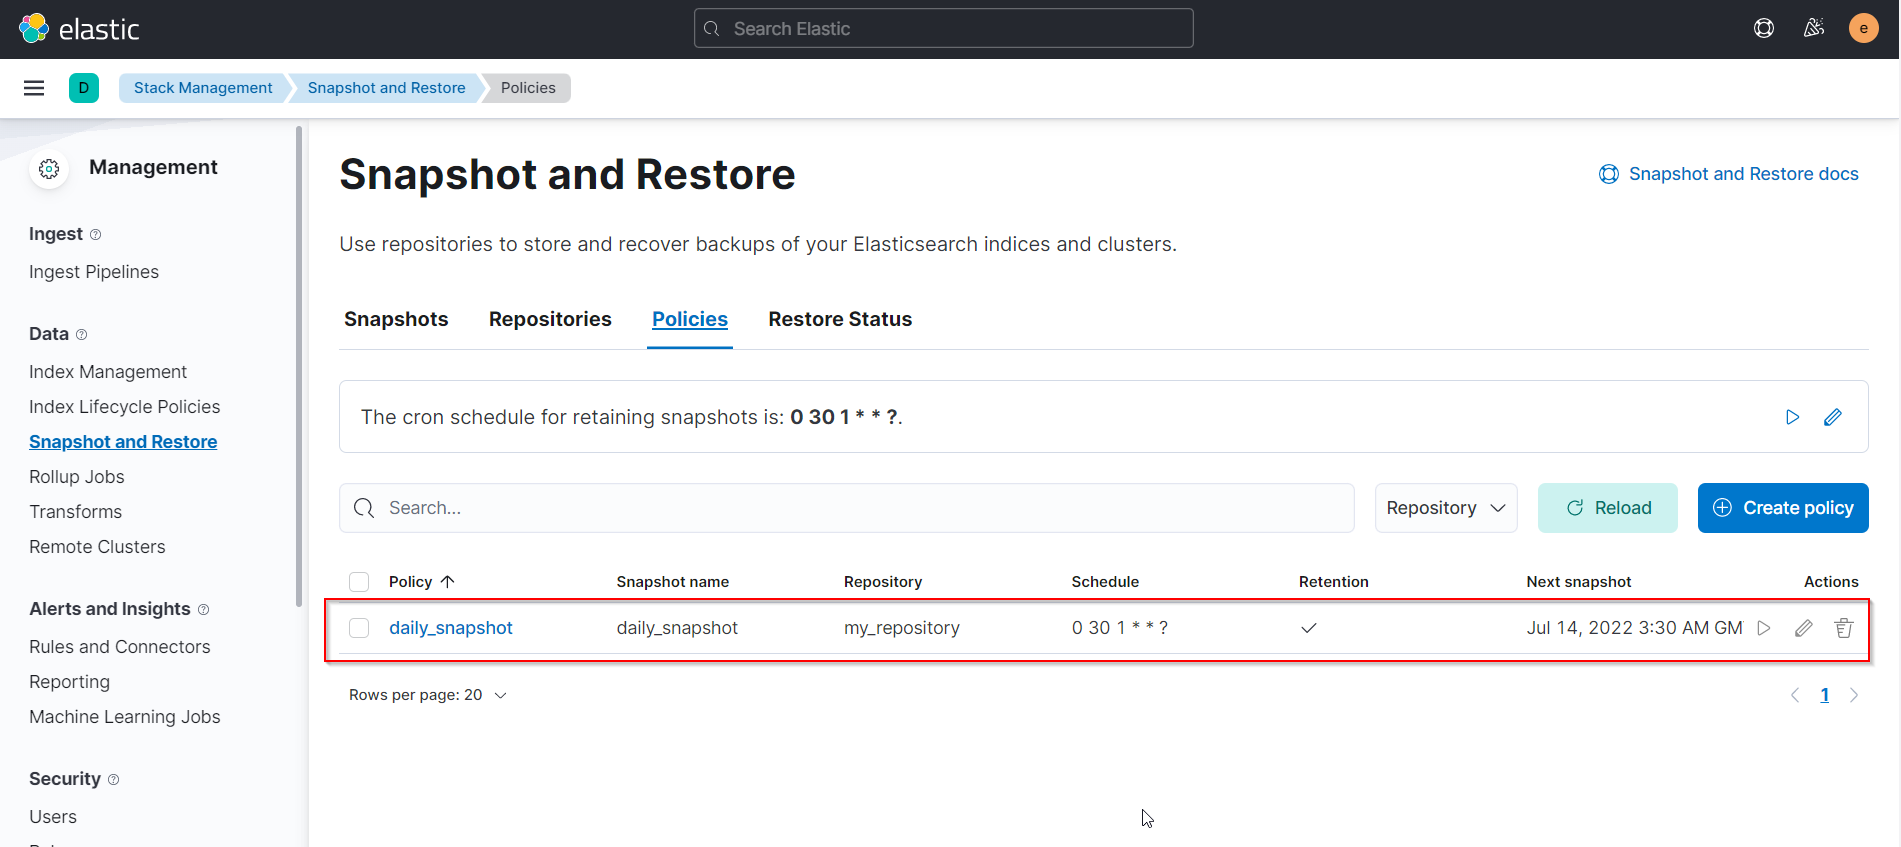
Create a daily snapshot policy
You should now see the configure snapshot policyPUT /_slm/policy/daily_snapshot { "schedule": "0 30 1 * * ?", "name": "daily_snapshot", "repository": "my_repository", "config": { "indices": ["wax-action-v1-000001"], "ignore_unavailable": false, "include_global_state": false }, "retention": { "expire_after": "30d", "min_count": 5, "max_count": 50 } }
-
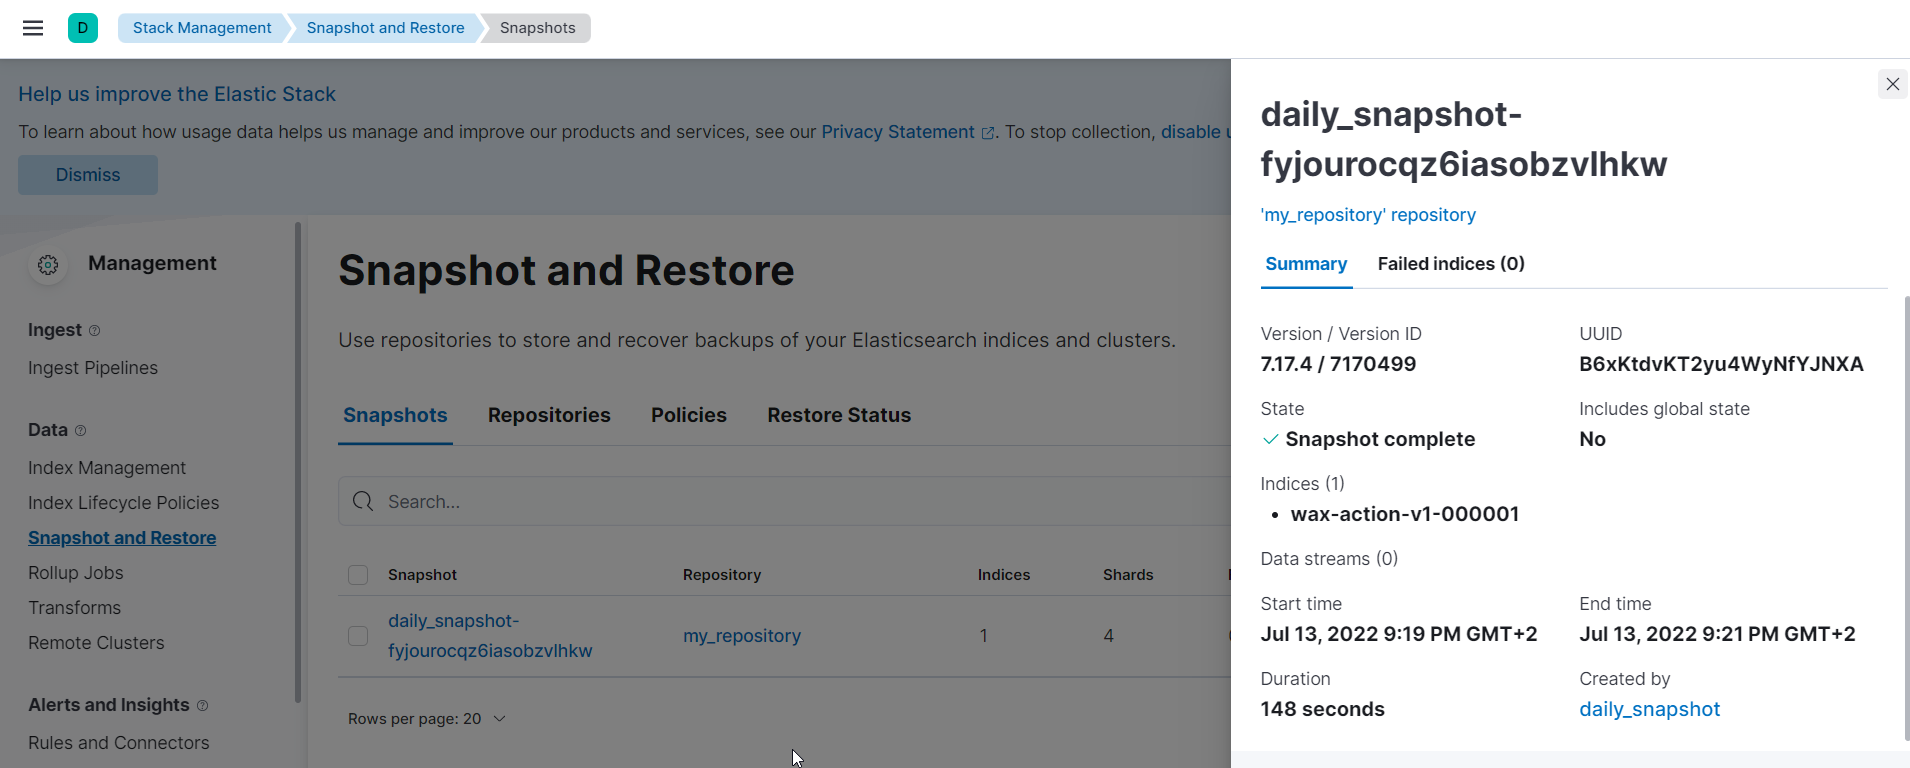
Trigger a run to make sure that the index/s you selected, backed up successfully
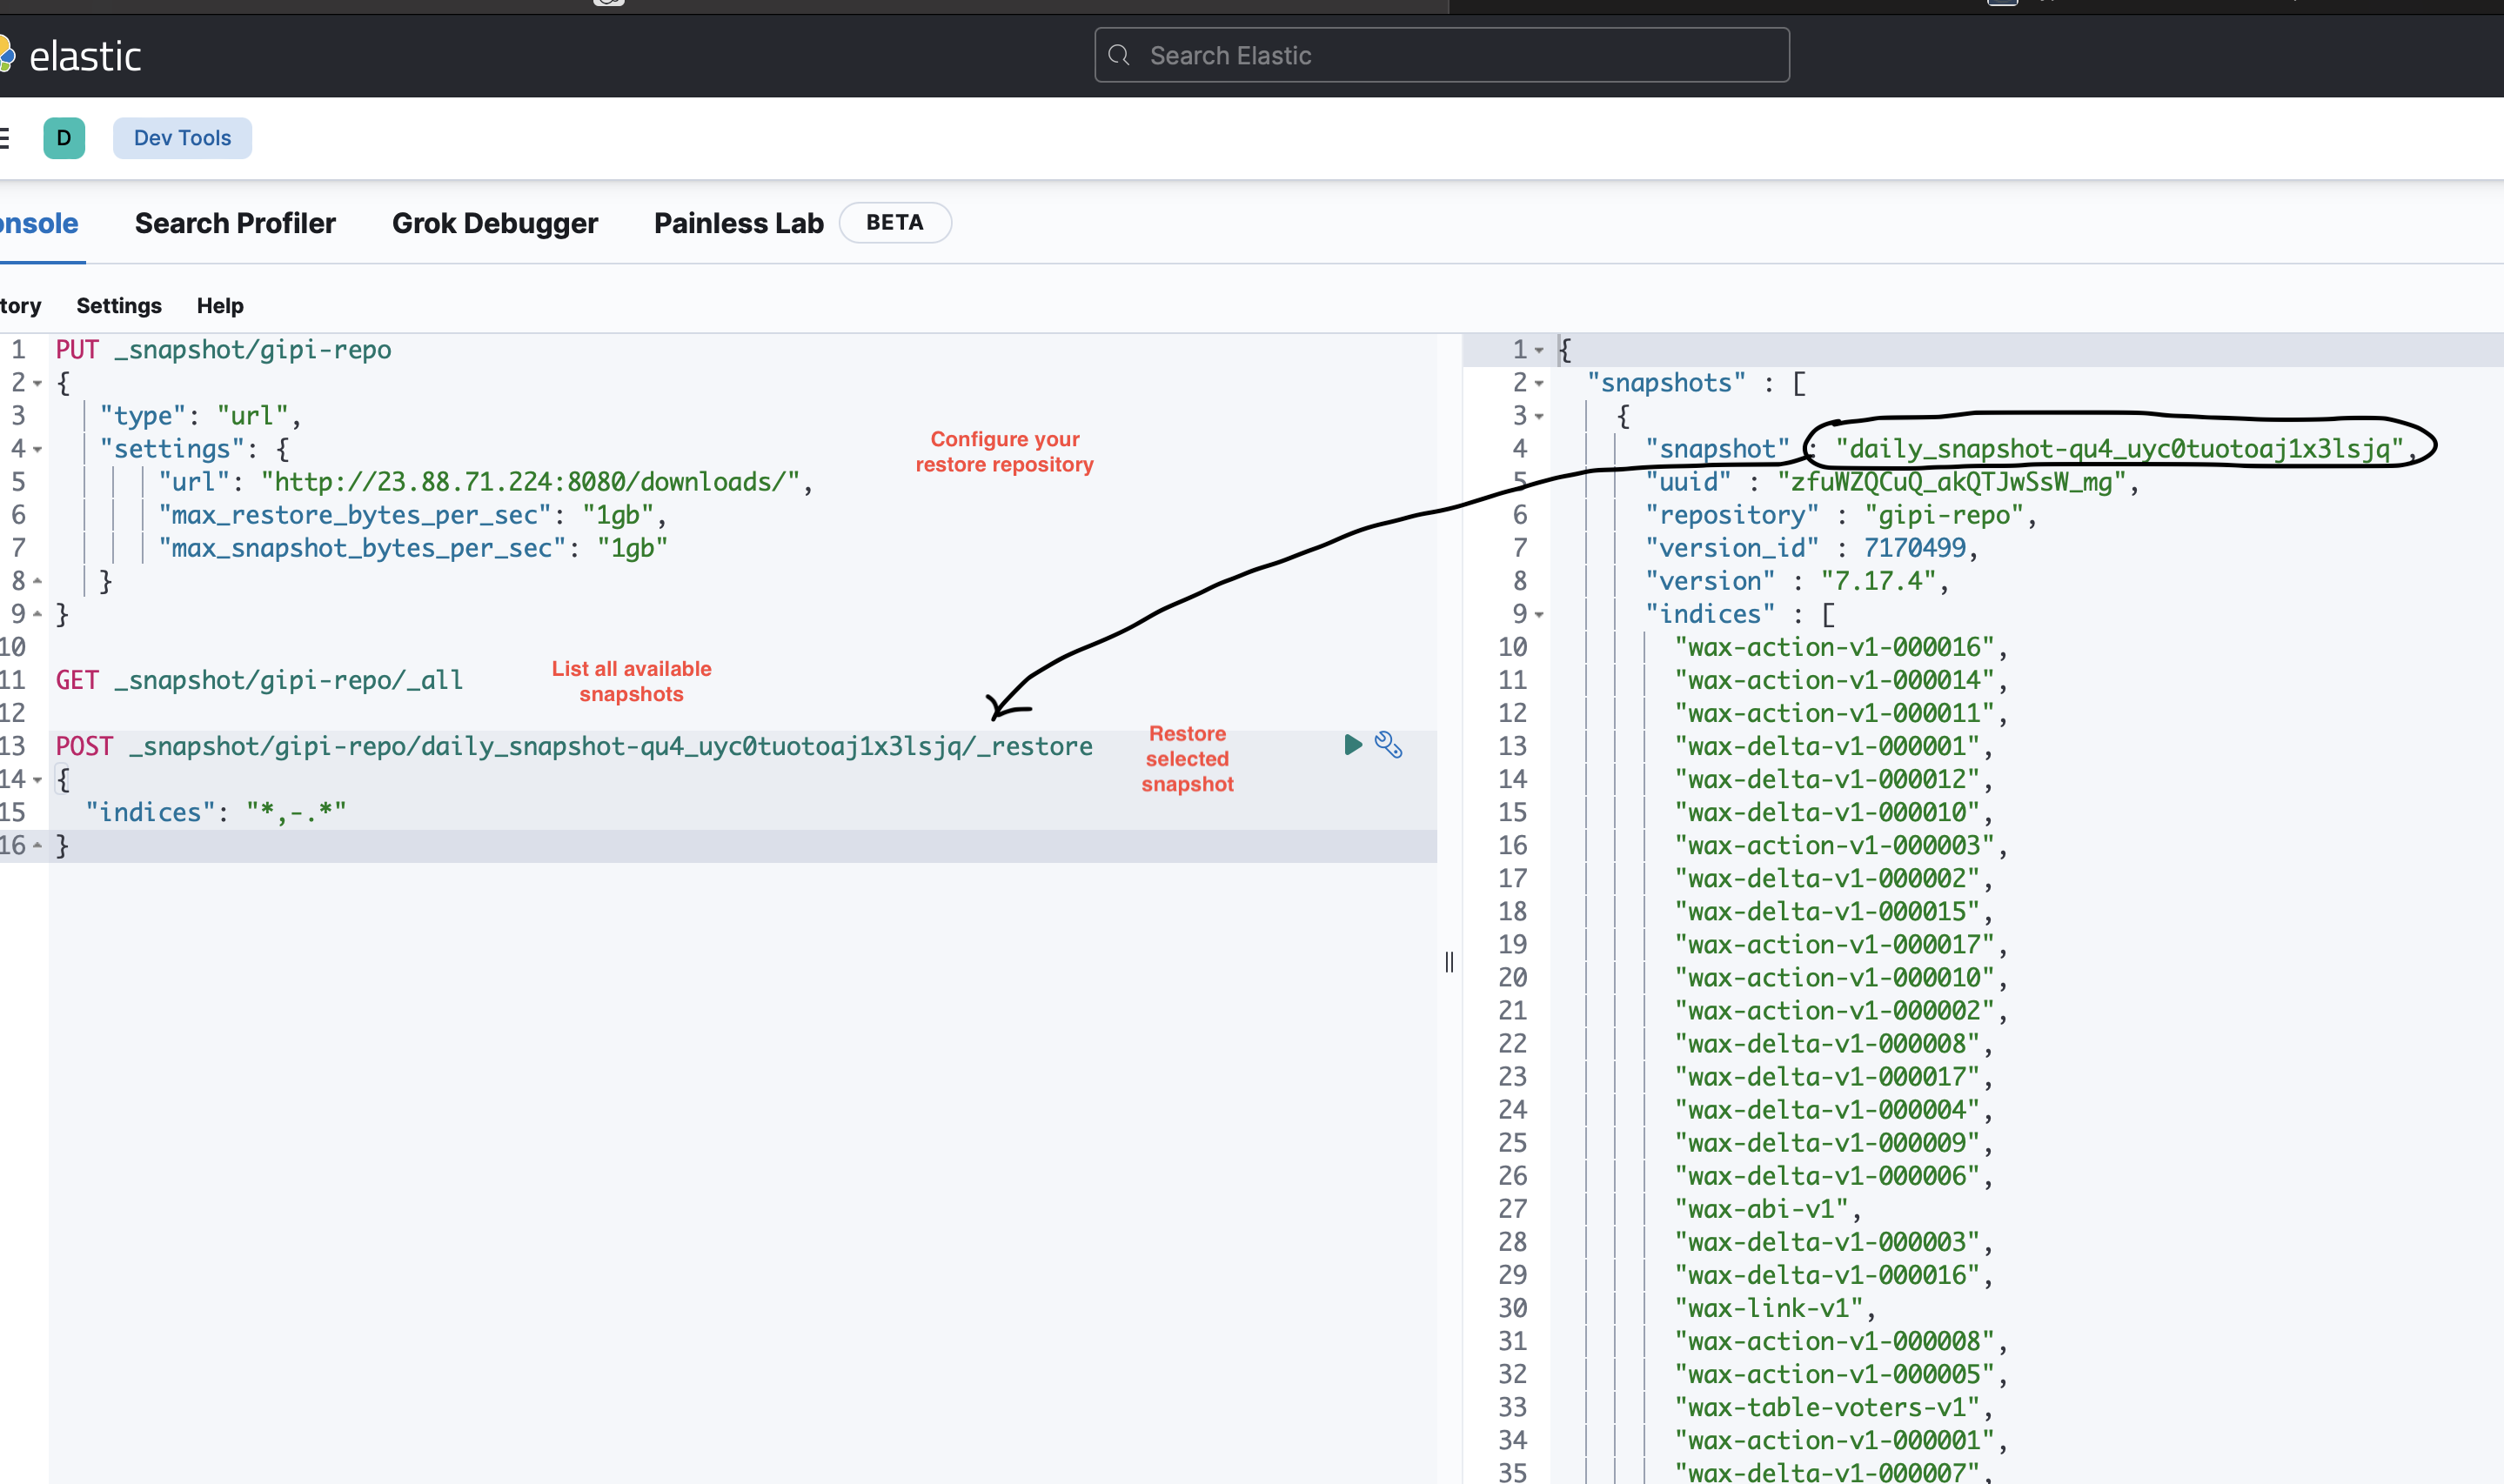
Restore a snapshot from url
Configure your repository URL from which you want to restart in your allowed list within the elasticsearch.yml
Optimize indexing operations for bulk processing
Reset elastic credentials
You can then have a copy of the following stored in credentials.file- apm_system
- kibana_system (configured in kibana.yml)
- kibana
- logstash_system
- beats_system
- remote_monitoring_user
- elastic (used to log into Kibana UI)
Upgrade Elasticsearch from 7.x to 8.x ==> !!Do not perform the upgrade yet as this process is being written/tested!!
- Create snapshot of all your elastic indexes
- Migrate system indices (if not already ticked)
- Review deprecated settings and resole issues for critical errors (if not already ticked)
- Address API deprecations if necessary
Create snapshot of all your elastic indexes
Create the following policy
PUT /_slm/policy/upgrade_snapshot
{
  "schedule": "0 30 1 * * ?",
  "name": "upgrade_snapshot",
  "repository": "my_repository",
  "config": {
    "indices": ["wax-*"],
    "ignore_unavailable": false,
    "include_global_state": false
  },
  "retention": {
    "expire_after": "30d",
    "min_count": 5,
    "max_count": 50
  }
}

Indexes (at the time of the upgrade on testnet)
wax-abi-v1
wax-action-v1-000001
wax-action-v1-000002
wax-action-v1-000003
wax-action-v1-000004
wax-action-v1-000005
wax-action-v1-000006
wax-action-v1-000007
wax-action-v1-000008
wax-action-v1-000009
wax-action-v1-000010
wax-action-v1-000011
wax-action-v1-000012
wax-action-v1-000013
wax-action-v1-000014
wax-action-v1-000015
wax-action-v1-000016
wax-action-v1-000017
wax-block-v1
wax-delta-v1-000001
wax-delta-v1-000002
wax-delta-v1-000003
wax-delta-v1-000004
wax-delta-v1-000005
wax-delta-v1-000006
wax-delta-v1-000007
wax-delta-v1-000008
wax-delta-v1-000009
wax-delta-v1-000010
wax-delta-v1-000011
wax-delta-v1-000012
wax-delta-v1-000013
wax-delta-v1-000014
wax-delta-v1-000015
wax-delta-v1-000016
wax-delta-v1-000017
wax-link-v1
wax-logs-v1
wax-perm-v1
wax-table-accounts-v1
wax-table-proposals-v1
wax-table-voters-v1
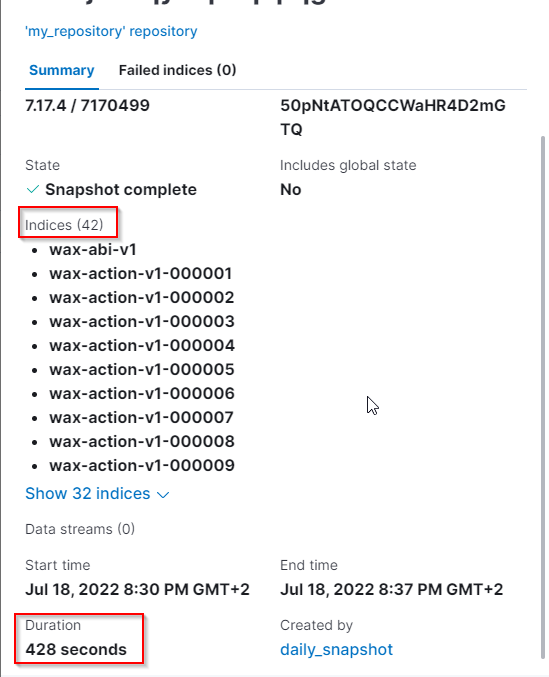
Using the optimized repository settings specific earlier in Create an indexing snapshot, it took 428s to snapshot 315GB of data
To Upgrade you elasticsearch, perform the following:
- Disable shard allocation
- Stop non-essential indexing and perform a flush
- Temporarily stop the tasks associated with active machine learning jobs and datafeeds
still to check
- Shutdown node
-
Register the new stable package apt source for elastic-8.x
rm -rf /etc/apt/sources.list.d/elastic-7.x.list
echo "deb https://artifacts.elastic.co/packages/8.x/apt stable main" | tee /etc/apt/sources.list.d/elastic-8.x.list
apt-get update
You should see https://artifacts.elastic.co/packages/8.x/apt stable InRelease in the repository being listed
-
Upgrade elasticsearch to 8.x
root@26b4315c7b5c:/etc/apt/sources.list.d# apt-get upgrade elasticsearch
Reading package lists... Done
Building dependency tree
Reading state information... Done
Calculating upgrade... Done
The following packages will be upgraded:
  curl dirmngr elasticsearch erlang-asn1 erlang-base erlang-crypto erlang-eldap erlang-ftp erlang-inets erlang-mnesia erlang-os-mon erlang-parsetools erlang-public-key erlang-runtime-tools erlang-snmp
  erlang-ssl erlang-syntax-tools erlang-tftp erlang-tools erlang-xmerl git git-man gnupg gnupg-l10n gnupg-utils gpg gpg-agent gpg-wks-client gpg-wks-server gpgconf gpgsm gpgv kibana libcurl3-gnutls
  libcurl4 libhttp-daemon-perl libpython2.7-minimal libpython2.7-stdlib libpython3.8 libpython3.8-minimal libpython3.8-stdlib libssl-dev libssl1.1 linux-libc-dev openssl python2.7 python2.7-minimal
  python3.8 python3.8-minimal rabbitmq-server redis redis-server redis-tools
53 upgraded, 0 newly installed, 0 to remove and 0 not upgraded.
Need to get 870 MB of archives.
After this operation, 606 MB of additional disk space will be used.
Recover Missing documents via a script
It often can happen that during the indexing operation you encountered a component failure which causes the indexing operation to miss certain blocks during the indexing.
Recover via a script
One of you valued community members has provided a python based utility to automate the recovery of documents which were lost during the indexing operations.
Please follow this link as a first attempt to resolve all missing documents
To confirm that no block data is missing, connect to Kibana and open dev tools under management
Run the following POST command to view the block histogram. Note that each bucket contains 10,000,000 documents
This way you can also easily verify which bucket has missing data

POST wax-block-*/_search
{
  "aggs": {
    "block_histogram": {
      "histogram": {
        "field": "block_num",
        "interval": 10000000,
        "min_doc_count": 1
      },
      "aggs": {
        "max_block": {
          "max": {
            "field": "block_num"
          }
        }
      }
    }
  },
  "size": 0,
  "query": {
    "match_all": {}
  }
}
The expectation here is that each bucket prior to the bucket in which documents are indexed, are fully populated with 10,000,000 documents
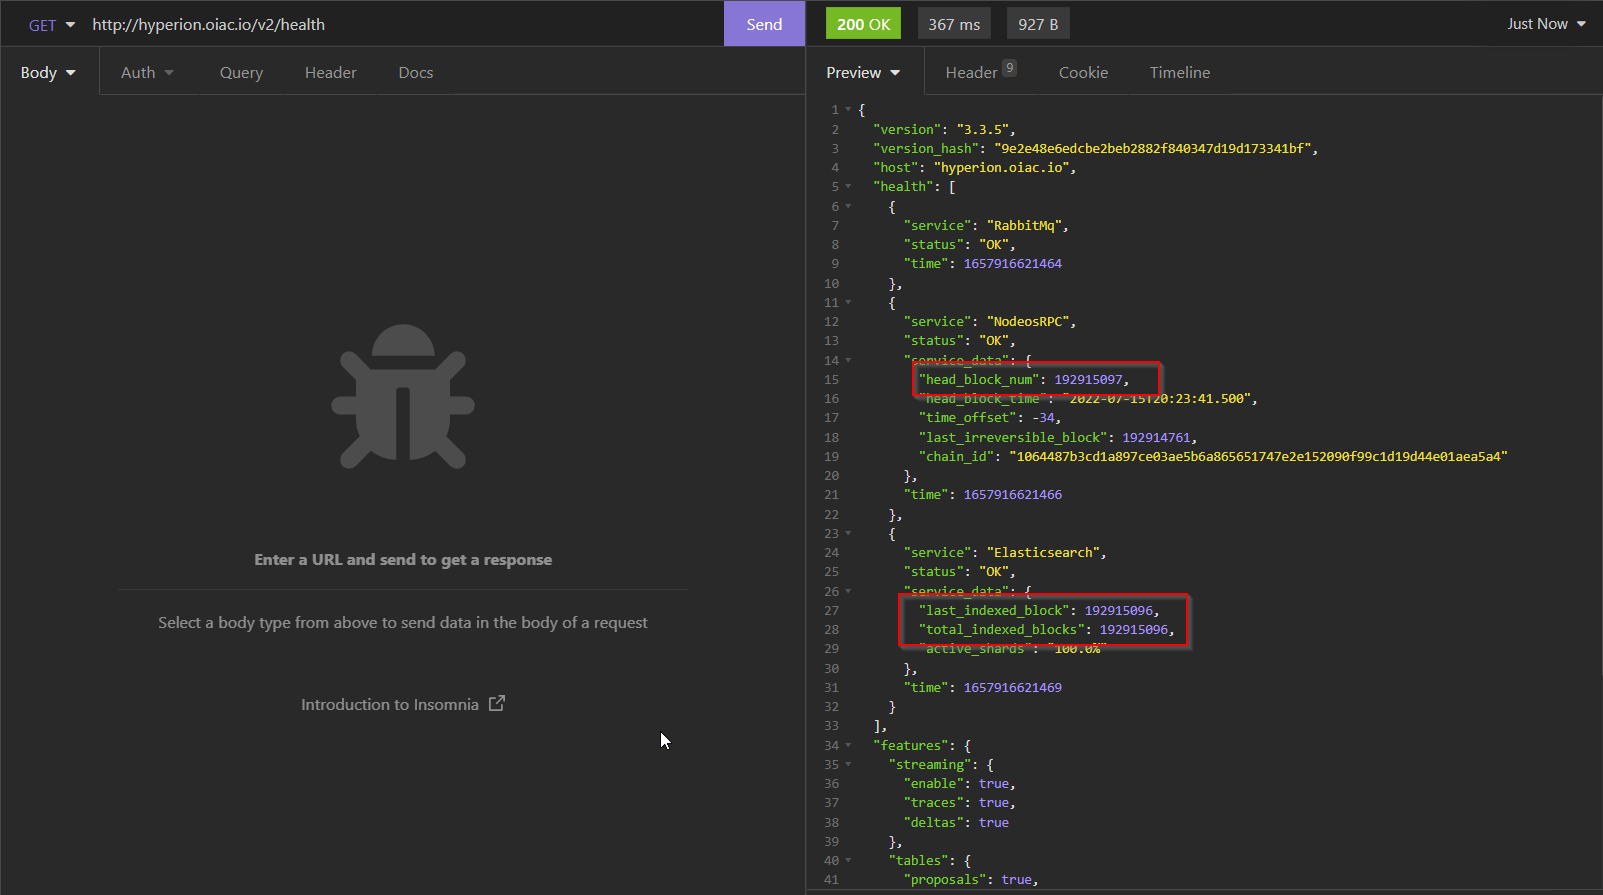
Run the wax indexer utility until you catch up with headblock the run the following to query hyperion health The expected respone will be to have your head_block_num, last_indexed_block and total_indexed_blocks in sync
Should this not be the case, start the manual recovery process as explained in the below section
Recover Missing documents manually
In this section, I will explain the manual process of finding the blocks and recovering the manually via the wax-indexer operations.
Determine the amount of documents stored in each bucket, which should contain 10000000 items
POST wax-block-*/_search
{
  "aggs": {
    "block_histogram": {
      "histogram": {
        "field": "block_num",
        "interval": 10000000,
        "min_doc_count": 1
      },
      "aggs": {
        "max_block": {
          "max": {
            "field": "block_num"
          }
        }
      }
    }
  },
  "size": 0,
  "query": {
    "match_all": {}
  }
}
"aggregations" : {
    "block_histogram" : {
      "buckets" : [
        {
          "key" : 0.0,
          "doc_count" : 9999998,
          "max_block" : {
            "value" : 9999999.0
          }
        },
        {
          "key" : 1.0E7,
          "doc_count" : 10000000,
          "max_block" : {
            "value" : 1.9999999E7
          }
        },
        {
          "key" : 2.0E7,
          "doc_count" : 10000000,
          "max_block" : {
            "value" : 2.9999999E7
          }
        },
        {
          "key" : 3.0E7,
          "doc_count" : 10000000,
          "max_block" : {
            "value" : 3.9999999E7
          }
        },
        {
          "key" : 4.0E7,
          "doc_count" : 10000000,
          "max_block" : {
            "value" : 4.9999999E7
          }
        },
        {
          "key" : 5.0E7,
          "doc_count" : 10000000,
          "max_block" : {
            "value" : 5.9999999E7
          }
        },
        {
          "key" : 6.0E7,
          "doc_count" : 10000000,
          "max_block" : {
            "value" : 6.9999999E7
          }
        },
        {
          "key" : 7.0E7,
          "doc_count" : 10000000,
          "max_block" : {
            "value" : 7.9999999E7
          }
        },
        {
          "key" : 8.0E7,
          "doc_count" : 10000000,
          "max_block" : {
            "value" : 8.9999999E7
          }
        },
        {
          "key" : 9.0E7,
          "doc_count" : 10000000,
          "max_block" : {
            "value" : 9.9999999E7
          }
        },
        {
          "key" : 1.0E8,
          "doc_count" : 10000000,
          "max_block" : {
            "value" : 1.09999999E8
          }
        },
        {
          "key" : 1.1E8,
          "doc_count" : 10000000,
          "max_block" : {
            "value" : 1.19999999E8
          }
        },
        {
          "key" : 1.2E8,
          "doc_count" : 10000000,
          "max_block" : {
            "value" : 1.29999999E8
          }
        },
        {
          "key" : 1.3E8,
          "doc_count" : 10000000,
          "max_block" : {
            "value" : 1.39999999E8
          }
        },
        {
          "key" : 1.4E8,
          "doc_count" : 10000000,
          "max_block" : {
            "value" : 1.49999999E8
          }
        },
        {
          "key" : 1.5E8,
          "doc_count" : 10000000,
          "max_block" : {
            "value" : 1.59999999E8
          }
        },
        {
          "key" : 1.6E8,
          "doc_count" : 3904020,
          "max_block" : {
            "value" : 1.639114E8
          }
        }
      ]
    }
  }
In this case, there are 16 buckets, 15 should contain 10,000,000 blocks each, with the last one still indexing
If at any time you do not have a doc_count of 10,000,000 in each bucket (except for the last one), there are document missing and validators will mark the system as incomplete
Example of 2 buckets having missing data
        {
          "key" : 1.4E8,
          "doc_count" : 9950000,
          "max_block" : {
            "value" : 1.49999999E8
          }
        },
        {
          "key" : 1.5E8,
          "doc_count" : 9998000,
          "max_block" : {
            "value" : 1.59999999E8
          }
        },
Next would be to view the individual buckets to narrow down the searches to find and index the missing blocks
Let us start by working on the 1st index which has missing data
Narrow down the search to 1,000,000 documents
Run the following command to retrieve 1,000,000 items at a time on bucket starting at 140,000,000
POST wax-block-*/_search
{
  "aggs": {
    "block_histogram": {
      "histogram": {
        "field": "block_num",
        "interval": 1000000,
        "min_doc_count": 1
      },
      "aggs": {
        "max_block": {
          "max": {
            "field": "block_num"
          }
        }
      }
    }
  },
  "size": 0,
  "query": {
    "bool": {
      "must": [
        {
          "range": {
            "block_num": {
              "gte": 140000000,
              "lte": 150000000
            }
          }
        }
      ]
    }
  }
}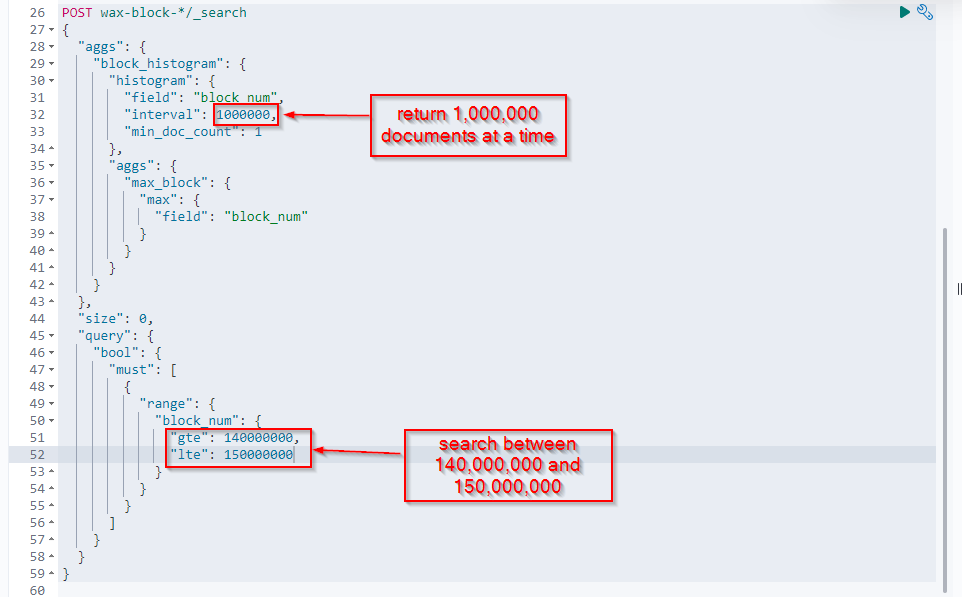
Viewing the results of the above query, either the blocks can be missing in multiple buckets, or in only 1, but the recovery process remains the same
The recovery process that be run for the entire bucket as well, but could be time consuming
For the purpose of this document, I will recover missing blocks from 2 buckets
Above, you can see
- bucket starting 145000000 (represented by key 1.45E8) has 25,000 blocks missing
- bucket starting 146000000 (represented by key 1.46E8) has 25,000 blocks missing
To start recovery the missing blocks, we need to use the wax indexer app provided as part of the hyperion install, and which is used to run the main indexing operations
Stop your current indexing
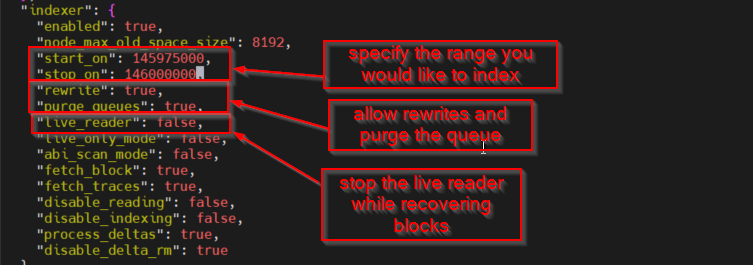
  "indexer": {
    "enabled": true,
    "node_max_old_space_size": 8192,
    "start_on": 145975000,
    "stop_on": 146000000,
    "rewrite": true,
    "purge_queues": true,
    "live_reader": false,
    "live_only_mode": false,
    "abi_scan_mode": false,
    "fetch_block": true,
    "fetch_traces": true,
    "disable_reading": false,
    "disable_indexing": false,
    "process_deltas": true,
    "disable_delta_rm": true
  },
- disable live_reader
- enable purge_queues and rewrite
- configure the start_on and stop_on parameters which will tell the indexer which blocks to recover (note examples used for recovery above)
Start your idexing operations to recover the first 25,000 blocks.
NOTE: to restart your wax-indexer after each change to take effect
  "indexer": {
    "enabled": true,
    "node_max_old_space_size": 8192,
    "start_on": 145975000,
    "stop_on": 146000000,
    "rewrite": true,
    "purge_queues": true,
    "live_reader": false,
    "live_only_mode": false,
    "abi_scan_mode": false,
    "fetch_block": true,
    "fetch_traces": true,
    "disable_reading": false,
    "disable_indexing": false,
    "process_deltas": true,
    "disable_delta_rm": true
  },
- disable purge_queues and rewrite
- enable live_reader
Restart and let it catch up to headblock again.